The living room is perhaps the most important room in your home as this is where you get to relax and spend quality time with your family. Many people spend a lot of time and money to make sure that their living room looks great, and designers often recommend investing in the living room if their client is on a tight decorating budget. One of the best things that you can do to refresh your living room is to create a focal wall, and depending on your preferences, your accent wall can be functional or decorative, or even both. Here are 5 ways that you can create an impressive-looking focal wall for your living room. Use reclaimed woodBarn walls or reclaimed wood, both real and faux, is immensely popular in home décor. Not only does reclaimed wood give your focal wall a warm and weathered look, but using this material will not harm the environment as it is a sustainable material for construction or remodeling. Have your builder cover your accent wall with reclaimed wood for a rustic look. Embed a fireplace Nothing is as luxurious and comforting as a fireplace in a living room. If you don’t care for a wood burning fireplace, consider embedding an ethanol fireplace insert in your living room focal wall. This type of fireplace will bathe your living room in warmth without smoke, bad odors, or particles that can be harmful to your health. According to the Environmental Protection Agency, the smoke from wood burning contains particles that can cause health problems such as a runny nose and bronchitis. As an ethanol fireplace only need bio-ethanol fuel to feed the fire, it’s safer for your health than a regular fireplace. Read this great article on the Advantages of Ethanol Fire Pits Compared to Gas Fire Pits.
Built-in shelving If you want to display your books and collectibles, consider having built-in shelving room as a living room accent wall. You can either paint the accent wall and all the shelving attached to it the same color, or paint the shelving in white and the accent wall a bright color, like yellow, turquoise, or red. Mirrors To make a stylish statement, paint your accent wall in a dark color, such as navy blue, then hang a few decorative wall mirrors once the paint dries. Try to find mirrors with golden accents to give your living room a touch of opulence. These are just a few ways to create an impressive-looking focal wall for your living room. Any of these tips will give your living room that wow factor that your family and friends will surely love.
Category: construction
Ways to save on heating costs this Winter
Although the days have been warmer here in Maryland, they are slowly becoming chillier as we near Christmas. If you are concerned about cranking up the heat because of the increase in your electric bill, check out our easy tips for reducing your energy costs.
Adjust your thermostat at night or during the day when you are away from you home. You can save about 10 percent per year on your heating bills by turning your thermostat down 10 to 15 degrees for eight hours a day, according to the US Department of Energy.
Keep your furnace clean and unblocked. Check your furnace filter regularly and replace it  when it gets dirty. A dirty filter makes your furnace or heat pump work harder, and leads to higher energy bills.
Plastic wrap your windows. Drafty windows can be major culprits of heat loss, but can easily be fixed by covering them with plastic. DIY window insulation kits start as low as $12 and can even be found at local stores like Target.
Hang thermal curtains. Invest in curtains with thermal lining that will block heat and UV in the summer and keep cold air out in the Winter.
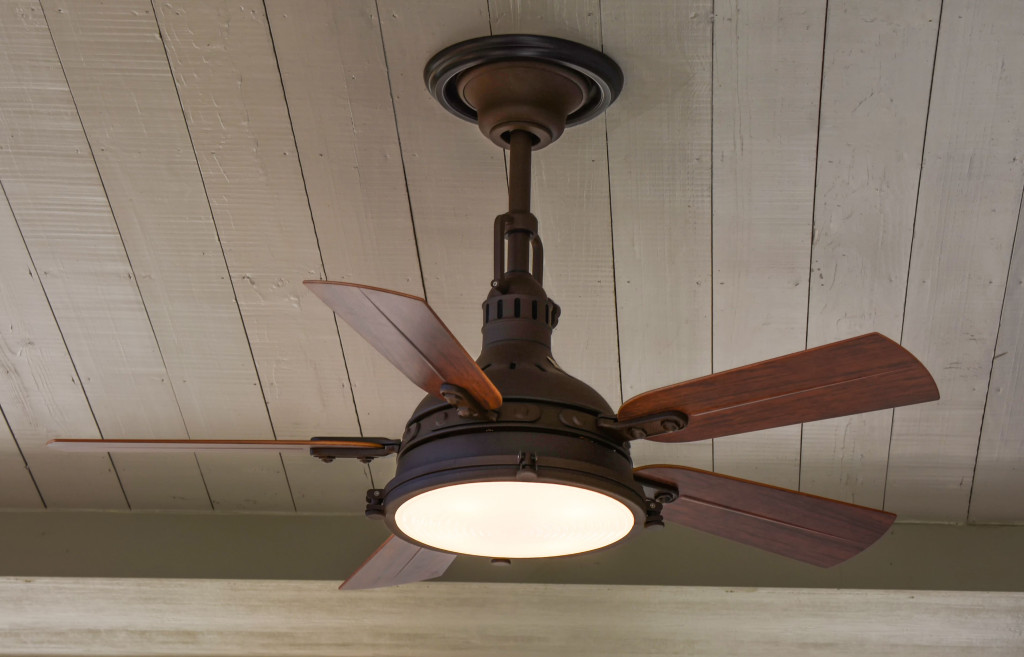 Reverse the ceiling fan. Most ceiling fans have a switch you can flip that will change the direction the fan blades are rotating. This will push hot air that has risen to the ceiling back down into the room.
Decorate for warmth. Put flannel sheets on your bed, warm rugs on your floors and extra throw blankets on the sofas.
Take advantage of free solar heating. Open curtains during the day to allow the sun to warm your home; close curtains at night to trap in the heat.
Close the damper. Sometimes overlooked this can be a major culprit in heat loss. Keep the damper closed when your fireplace isn’t in use to prevent warm air escaping.
Lawn Mower Safety
Springs here and that means more yard work for many families who are starting to plant gardens and tend to their yards. Did you know that approximately 68,000 people are treated in emergency rooms for lawn mower-related injuries each year (AAOP)? Sadly more than 9,000 of them are children under age 18.

“The overwhelming majority of these injuries result in amputations that require reattachment or reconstructive surgery,” says Rick Redett, M.D.
The majority of lawn mower-related injuries can be prevented by following a few safety guidelines and using common sense. Check out the list below for a few safety precautions you can take to prevent injuries.
- Keep all children indoors while a power mower is in operation

- Do not allow children under 16 to use ride-on mowers
- Do not allow children under 12 to walk behind mowers
- Do not allow children to ride as passengers on ride-on mowers
- Prevent injuries from flying objects, such as twigs and stones by cleaning the lawn before mowing begins
- Use a collection bag for grass clippings or a plate that covers the opening where cut grass is released
- Wear protective goggles and close-toed shoes when operating a mower or when near one
- Turn off the mower immediately if you see a child running toward you. Children can fall and slip into the blade, especially if the grass is wet
- Do not pull the mower backward or mow in reverse unless absolutely necessary
- Always turn off the mower and wait for the blades to stop completely before removing the grass catcher, unclogging the discharge chute, or crossing gravel paths, roads, or other areas
- Make sure that blade settings (to set the wheel height or dislodge debris) are done by an adult, with the mower off and the spark plug removed or disconnected
Wanted: Hippotherapy Sponsor

Hippotherapy is the use of horseback riding as a therapeutic or rehabilitative treatment. The movement of the horse affects a rider’s posture, balance, coordination, strength and sensorimotor systems.
It is believed that the warmth and shape of the horse as well as its rhythmic, three-dimensional movement along with the rider’s responses to the movement of the horse can improve the flexibility, posture, balance and mobility of the rider.
This program differs from therapeutic horseback riding, because the work is one-on one, and the rider does not direct the horse. Licensed health professionals including physical therapists, occupational therapists and speech-language pathologists guide the rider’s posture and actions while the horse is controlled by assistants at the direction of the therapist.

The horse’s unique walk transfers variable, repetitive and rhythmic movement to the client, which provides sensory input to the brain and nervous system. The resultant responses in the client are similar to human movement patterns of the pelvis while walking. An average horse takes 120 walking steps per minute, allowing 120 chances each minute for a client to experience this unique movement that cannot be replicated by another apparatus or equipment. During a session the therapist, working in conjunction with a specially trained horse handler, can grade or adapt this movement to provide a “just right challenge” for each client. Most clients respond very enthusiastically to hippotherapy treatment and thoroughly enjoy the opportunity to engage with the horse in an environment that is much different than a typical therapy clinic.
Who benefits from hippotherapy?
A wide variety of individulas can experience benefits from hippotherapy. Some diagnoses commonly treated by this therapy include:
- Attention Deficit Disorder
- Autism
- Cerebral Palsy
- Closed Head Injury
- Developmental Delay
- Down Syndrome
- Emotional Disorders
- Hearing Impairment
- Multiple Sclerosis
- Muscular Dystrophy
- Paralysis
- Scoliosis
- Spinal Bifida
- Traumatic Brain Injury
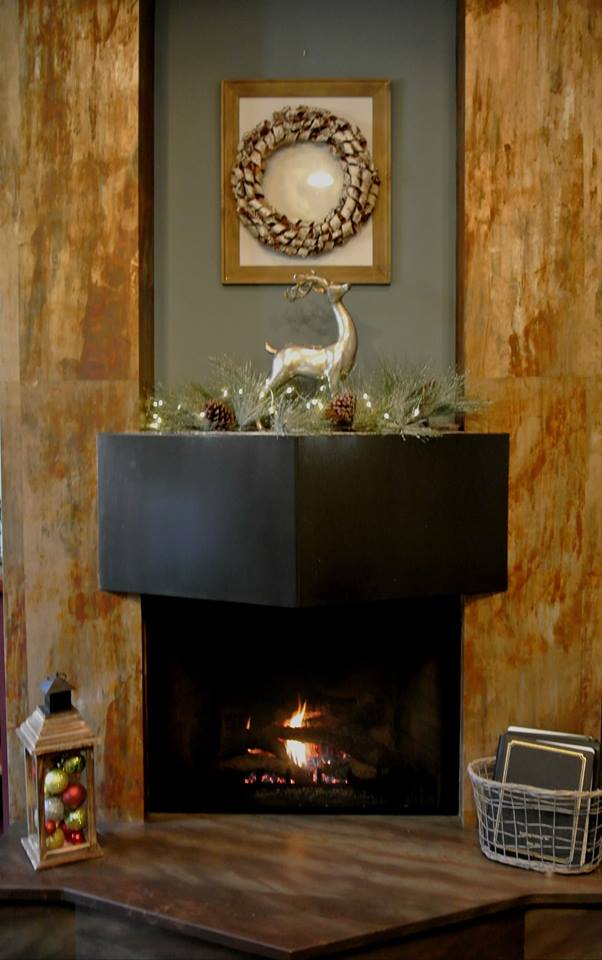
Simple Holiday Decorating
Can you believe it’s already December? If you’re like most of us and have waited to decorate until now check out our list below for ideas that you can do in less time than it takes to hang stockings by the chimney with care.
One of my favorite go to decorations w hen I’m in a pinch is using extra ornaments to decorate non traditionally. Place ornaments on a cake stand, in a glass vase or anything else you can
find for an extremely simple, yet stunning centerpiece. You can also use leftover ornaments to decorate windows. Simply tie a ribbon thru and secure to either your curtain rod or a hook affixed to the window.

For an easy and festive table display gather some doilies (white, silver, red, or gold) and tape them together. Use vases of varying heights filled with ornaments and pine cones. You can even spray paint the pine cones silver, gold or white for an extra special touch. Finish the display off by tying a ribbon around each glass.

Can’t find a wreath this late in the game? Grab a handful of twigs from your yard or the craft store. This simple display makes a wonderful hanging decoration to put on your front door or even above the mantel. To secure this, wrap a wide rubber band around the twig ends. Tuck a sprig of greens, such as rosemary or eucalyptus, inside the rubber band for color. Cover the rubber band with a ribbon.
Have something sitting around that you’re not using or that your child has outgrown? Perhaps an old pair of rain boots? Use those in your front porch display by dressing them up with twigs, greens and ribbon for a welcoming display. You can add weight with rocks to keep the boots from falling over. Here’s just a couple of our favorites.


If you have a birdbath in your yard dress it up with garland, a large red ball, pine cones or any other left over Christmas decorations you have laying around.
If you need a display for your mantel try wrapping empty food boxes in various wrapping papers or fabrics. Finish each package off with a decorative ribbon or flowers. Arrange these on your mantle along with ornaments, pine cones, or candles for a festive display!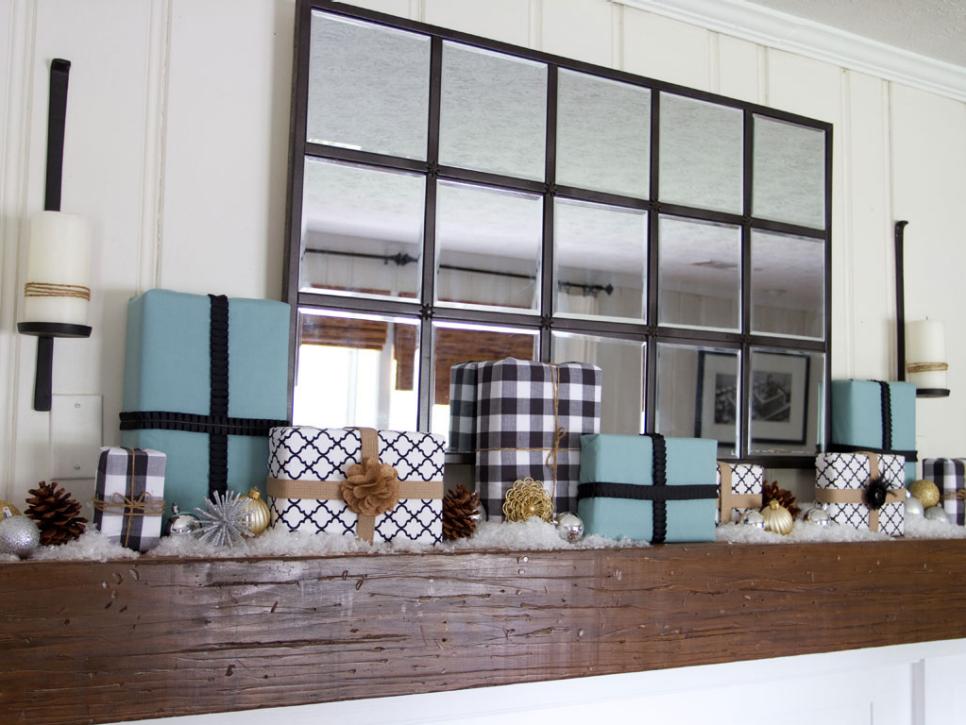
Get Your Home Ready for Thanksgiving
Everyone knows what happens when Thanksgiving goes bad—and it can go really bad. really quickly. In fact, one of the busiest days of the year for plumbers is actually the day after thanksgiving. Horror stories of garbage disposal mishaps, sinks that are clogged, and dishwasher meltdowns haunt those homeowners affected by the pressure. With a little advance planning you can avoid most disasters this holiday and actually enjoy it surrounded by your friends and family.
Get your oven in check
Contrary to popular belief…it is not a good idea to run your oven’s self-clean cycle in the days before cooking. The cycle can be so stressful on the appliance that it could cause it to breakdown if you are doing heavy duty cooking in the days after running it. Instead use a damp cloth to wipe around the burners and and save the big clean u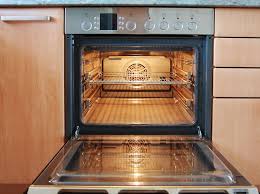 p for after the big day. In addition to this assure your temperature gauge is functioning properly. An easy way to test this is to pick up a cooking thermometer at the grocery store. Place the thermometer in the oven, set it to 300 degrees and wait for it warm up. If the gauge matches then you should be good to go.
Clear Out Old Food
This step is often overlooked, but taking a few minutes to clear out your pantry, fridge, and freezer can save you a huge headache on the big day. These will soon become packed with ingredients, leftovers and of course, a giant turkey. Cleaning them out now will save you a lot of aggravation later.
Child-proof Your Kitchen
Hosting Thanksgiving may involve having family and friends of all age groups. If you are expecting small children or toddlers on Thanksgiving, and it’s been awhile since you’ve had a baby in the house, make sure you go through your home & look for things that could potentially be dangerous. Cover exposed outlets, place dangerous or breakable objects up high, and remove tripping hazards on the floor
Inventory Cookware
Keeping cookware organized can go a long way toward creating an efficient holiday meal. First, assure you have enough pots & pans to prepare all of the dishes on the menu. Do you have enough dishes, serving platters, and silverware? Use Post-it notes to label each dish with what will be served in it.
Sharpen Knives
You may not notice how much your knives have dulled until you are faced with slicing endless vegetables, meats, and other ingredients.
Rethink Your Seating Areas
Do a headcount ahead of time to be sure you’ve got room for everyone so you’re not left scratching your head and scrambling around. To improve flow and create room for more seats, experiment and move your sofa, chairs and side tables around. Do you have any extra tables and chairs that you could pull out to use? Before you start asking to borrow from friends and family or spend money on rentals, look around your house. Can a table in the office be re-purposed as a kids’ dining table? Cleared-out small bookcases can double as appetizer tables with a table cloth on top. Get creative!

Check Smoke Alarms
Did you know that the greatest number of cooking fires actually occur on Thanksgiving day? Holiday cooking and baking, along with candles and the distraction that parties create, can accidentally create unintentional fires. Before Thanksgiving, test your smoke alarms and make sure they are functioning in all areas. Have a small kitchen fire extinguisher in plain site as well as near the fireplace or any exposed flames.
Avoid Garbage Disposal Breakdowns
No matter how delicious your meal, you’ll inevitably end up with plenty of scraps. To make sure your disposer can keep up, grind hard materials, such as small bones, fruit pits, and ice before everything else. It helps scrape the inside of the disposer and pipes, removing any buildup. Avoid letting non-food items like tea bags, bread ties, and napkin rings fall into the sink where they can cause jams. Don’t put grease or fat down the disposer or any drain. Instead, pour grease into a glass jar or container, and then discard in the trash once it solidifies. Bonus Tip: to give your disposer a fresh scent, grind lemons and other citrus fruits.
Line Baking Dishes With Aluminum Foil
Our favorite clean-up tip: Put aluminum foil on the bottom and sides of baking pans before you start preparing food! When it’s time to eat, you can transfer the baked food into a serving dish and throw out the messy foil. You’ll dr astically cut down pan-scrubbing time.
Prepare for Overnight Guests
Do you have out of town family or friends coming to stay for the holidays? If so make sure your spare rooms & baths are ready before they arrive so your guest will feel welcome.
Make an Emergency Stain-Fighters Kit
When you mix large groups of people (and especially children) with food, spills are all but inevitable. Keep all your stain fighters in one place, close at hand to minimize the damage.
Some handy helpers may include:
- Non bleach detergent (carpet stains, urine stains)
- Vinegar (carpet stains, urine stains)
- Ammonia (carpet stains)
- Bleach (solution-dyed carpet stains)
- Rubbing alcohol (glue, ink stains)
- Hydrogen peroxide (stone countertop stains)
- Club soda (fabric stains)
- Baking soda (grease splatter, fabric stains)
- Lemon juice (fabric stains)
- Salt (red wine stains)

Preparing your Home & Family for a Hurricane

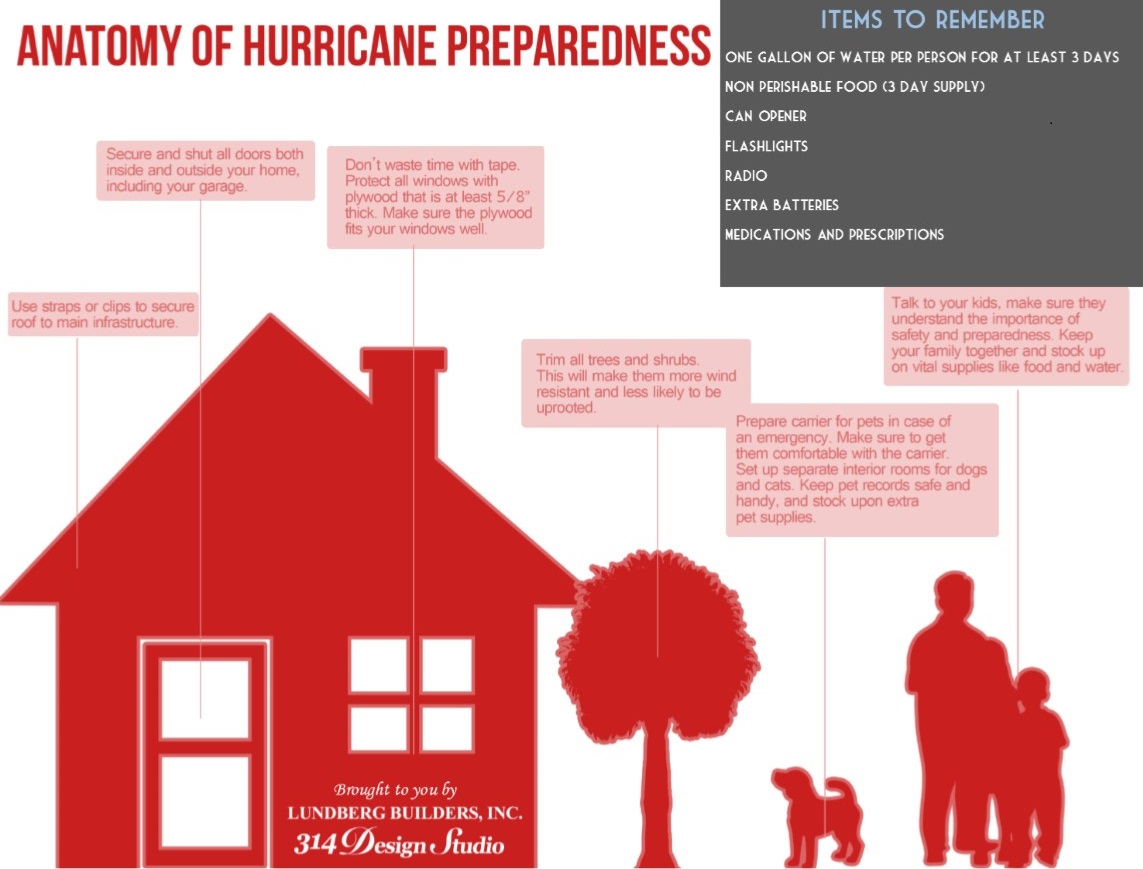
Thunder & lightening & wind, oh my! The current forecast of a hurricane means your home and other personal property could be at risk for damage from extreme winds, rain, hail and lightning. Tropical storms, including hurricanes at any level, can cause significant damage to your home and property, from missing shingles and fence posts to collapsed roofs and walls. Knowing what to expect and being prepared for the storm can make all the difference for you and your homes safety. The tips below can help you plan ahead for the upcoming storm, as well as for the future.
- Check your insurance coverage! Many people overlook this important step until after the fact. Assure that it reflects the current state of your home & consider adding flood insurance and coverage for additional living expenses in case your home is uninhabitable after a storm. Bonus Tip: Take photos or videos of the contents of each room. This will save you a major headache in case of a disaster.
- Secure windows and sliding glass doors. Although not the best option, one solution is to tape your windows.. The tape isn’t going to keep an object from breaking your window if wind flings it at your house, but it should keep the glass from flying around the room if an object does hit. It’s ideal to have heavy plywood to fit your windows on hand or metal shutters installed, but these would all need to be done in advance. We recommend using 3/4 inch plywood and drilling screw holes 18 inches apart. Once a window is broken, the wind blows inside to not only wreck the interior, but also to apply upward pressure on the roof. This is why this step is so important!
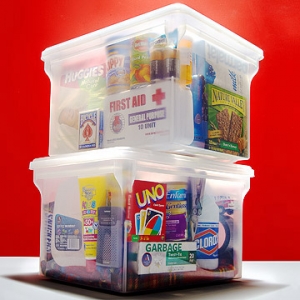
- Prepare and stow a hurricane emergency kit! Your kit should include bottled water (a gallon of water per person for at least 3 days is recommended), non-perishable food, a first aid kit and any medications. Don’t forget extra clothes, flashlights, a radio, extra batteries and disposable dishes. Keep these supplies in a specific spot in your home that everyone can get to quickly and easily.
- Store important documents such as birth certificates, social security cards, insurance policies and passports in a watertight containe
 r.
r. - Have an established evacuation plan & family emergency plan in place. If you don’t have transportation of your own, make arrangements with friends or family members. Here is an awesome printable from FEMA to help you put together a Family Emergency Plan. Click the image to the right for the full printable.
- Maintain your outdoor area. Cut tree branches to no more than four to five feet long, so they do not fall and damage power lines or your property. Empty your gutters so water can properly drain
- Fill up your car’s gas tank before the storm
- Turn your refrigerator and freezer to their coldest settings to help keep food cold in case of a power outage.
- It’s also highly recommended that you unplug all non-essential appliances and electronics
- If you’re in an area that is prone to flooding buy sandbags. These can be used to line your house to protect against minor flooding.
- If your home has a pool, you’ll need some additional preparation. Items around the pool, like furniture, toys, and skimmer lids should be brought inside to avoid becoming projectiles. (Some opt to throw their furniture into the pool, but doing this can actually cause damage to the pool’s finish). Turn off the gas supply at the meter and the filter pump at the breaker and store the filter indoors during the storm.
- Bring in all outdoor furniture, decorations, garbage can and anything else that is not tied down.
- Familiarize yourself with hurricane evacuation routes in your area and where to find higher ground. Determine where you would go and how you would get there if you needed to evacuate. It’s always better to be prepared.
- Do not use a gas oven or range to heat your house and never run a generator inside where exhaust fumes can accumulate!
- If you have kids and you’ve dealt with a power outage before…you probably know the struggle. We don’t realize how much we rely on all things electric u
 ntil it’s not available. Prepare a fun emergency kit now for the kiddies so you don’t drive yourself crazy being stuck in the house. Include Play-Doh, coloring books, Lego’s, puzzles, balloons and fun surprises. Here are a few more ideas for staving off cabin fever: Flashlight tag, board games, crafts (pasta necklace anyone?) freeze dance and hide and seek.
Although they are predicting that Hurricane Joaquin will stay out to sea, the forecast track is still very uncertain. Have an emergency plan in place! Taking steps now can also help preparing for a future hurricane or major storm a little less of a headache.Remember to stay tuned to your local forecast for updates and possible warnings.
Your Home’s Fall Checklist
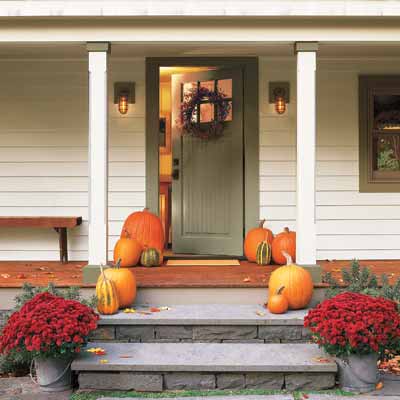
Fall means vibrant red, orange, and yellow foliage, lots of pumpkins, and refreshingly cool temperatures. But, it also means winter isn’t far away. Here are a few projects—from looking after the exterior of your home to maintaining your heating system—that can help your home gear up for the cold and save you some cash.
 Light the Way With Outdoor Lanterns. Colder days, means less daylight. Add outdoor lanterns or lights to your pathway to have some light when you arrive home. This will also help to enhance the curb appeal of your home, while adding a measure of safety and security.
- Remove garden hoses from outdoor faucets and store them in a shed or garage. Leaving hoses attached can cause water to back up in the faucets and in the plumbing pipes just inside your exterior walls. If freezing temps hit, that water could freeze, expand, and crack the faucet or pipes. Make this an early fall priority so a sudden cold snap doesn’t sneak up and cause damage.
 Here’s the chore on everyone’s “least favorite” list: clean your gutters. Clogged rain gutters can cause ice dams, which can lead to expensive repairs in winter. After the leaves have fallen, clean your gutters to remove leaves, twigs, and gunk. Make sure gutters aren’t sagging and trapping water; tighten gutter hangers and downspout brackets if necessary. Annually your roof’s drainage system diverts thousands of gallons of water from your house’s exterior and foundation walls. That’s why it is so important to keep this system flowing smoothly.Your downspouts should extend at least 5 feet away from your house to prevent foundation problems. If they don’t, add downspout extensions (typically about $10 to $20 each).
*Pro Tip: After cleaning your gutters, cover them with mesh guards to keep debris from collecting again
- Grab a couple of tubes of color-matched exterior caulk and make a journey around your home’s exterior, sealing up cracks between trim and siding, around window and door frames, and where pipes and wires enter your house. Preventing moisture from getting inside your walls is one of the least expensive — and most important — of your fall maintenance jobs. Gaps in caulk and weather-stripping can account for 10% of your heating bills, according to the U.S. Department of Energy. Because weather stripping can deteriorate over time, it is important to inspect it periodically. To check the efficiency of your weather stripping try this: close a door or window on a strip of paper; if the paper slides easily, it’s not doing its job.

- Prune plants: Late fall is the best time to prune plants and trees because the summer growth cycle is over. Your goal is to keep limbs and branches at least 3 feet from your house so moisture won’t drip onto roofing and siding, and to prevent damage to your house exterior during high winds.
- Before the chill sets in, make an appointment for your furnace’s annual checkup. To avoid the last-minute rush, consider scheduling this task in early fall, before the heating season begins. Without this yearly cleaning and inspection, a system can wear itself out quickly, pump deadly carbon monoxide into your home, or simply stop working. Remember to change your furnace filters, too. This is a job you should do every two months anyway, but if you haven’t, now’s the time! You’ll notice a difference in the air quality, and your furnace will run more efficiently. Disposable filters can be vacuumed once before replacement. Foam filters can also be vacuumed, but don’t need to be replaced unless they are damaged (use a soft brush on a vacuum cleaner). If the filter is metal or electrostatic, remove and wash it with a firm water spray.
- Take steps to repair damaged sidewalks, driveways, and steps before things get icy. Damaged walkways, drives, and steps are a hazard year round, but the dangers are increased when the weather turns icy. Look for cracks more than 1/8-inch wide, uneven sections, and loose railings on steps. Check for disintegration of asphalt, or washed-out materials on loose-fill paths. Fixing these smaller problems in the fall is also critical to preventing little problems from becoming major future expenses.
- It’s smart to do a safety check of your home at minimum once per year. Here are some pointers on how to do this.

- Test smoke and CO monitors. Test the detectors by pressing the test button or holding a smoke source (like a blown-out candle) near the unit. Replace the batteries in each smoke and carbon monoxide detectors if necessary. If you haven’t already, install a smoke detector on every floor of your home, including the basement.
- This is also a good time to get the family together for a review of your fire evacuation plan.
- Check fire extinguishers. Every home should have at least one fire extinguisher. Annually, check the indicator on the pressure gauge to make sure the extinguisher is charged. Make certain that the lock pin is intact and firmly in place, and check that the discharge nozzle is not clogged. Clean the extinguisher and check it for dents, scratches, and corrosion. Replace if the damage seems severe. Note: Fire extinguishers that are more than six years old should be replaced!
- Fire escape plans. Every bedroom, including basement bedrooms, should have two exit paths. Make sure windows aren’t blocked by furniture or other items. Ideally, each upper-floor bedroom should have a rope ladder near the window for emergency exits.
As you’re enjoying the last few weeks of warm weather, make sure that your home is prepared for the coming colder days. Preventative maintenance now will save money on expensive emergency repairs and wasted energy costs. Properly maintaining your home also enhances its value and appeal and is less effort than managing a crisis later. Taking the steps above will have you & your home ready for the chilly days ahead!
10 Things to Ask Your Contractor or Remodeler Before You Start Your Project
Remodeling or building a new home is a big financial and emotional investment. You’ll probably be seeing quite a lot of your contractor, depending on the size of the project and the amount of subcontracting involved, so it’s important to find someone you can get along with who’ll do the job right. In order to make a solid choice, there are some key questions you should ask potential contractors or remodelers to ensure you’re getting a good match, in addition to protecting your family. This is your home, after all; you want someone who’s dependable and determined to see the project through to the end. Knowing what to expect before the project gets started will help you better prepare for the process. We’ve compiled a list of 10 questions you should always ask your contractor before starting a home remodeling or building project.

- Are they licensed and can you obtain copies: Maryland requires home improvement contractors/builders to be licensed and all Sales employees to be licensed as well. Lundberg Builders is licensed by MHIC license #11697 and MHBR#749. Our consultant is also licensed by MHIC #93307. We will be happy to provide you a copy of our license upon request.
- Are they insured and can you obtain copies: Maryland requires home improvement contractors/builders to be insured. Lundberg Builders is insured and we will be happy to provide you a copy of our insurance upon request.
- How long have they been in business: 50% of small business will go out of business in their first four years. Companies that have been in business for more than 10 years have less risk and more stability. Lundberg Builders has been in business for more than 30 years founded in 1977.
- Can they provide you a list of references: Lundberg Builders feels that our references should be given to you as per your specific project, we also feel that while our past clients are our best voice we also respect their privacy. With that in mind we will provide you up to 3 references per your project upon request while also trying to preserve our clients’ time and privacy.
- Are they a member of the Local Better Business Bureau: Members of the local BBB adhere to a strict code of business ethics, honesty and integrity. You can research the status of each business thru BBB’s website at bbb.org. Lundberg Builders is an accredited A+ business.
- Are they a sole proprietor: Ask yourself, how much risk am I willing to take by hiring a contractor that preforms all the aspects of their business with no other points of contact? What if something happened? Who would fill in? Does the project get finished? Lundberg Builders provides you with multiple contacts throughout your project. We have eleven carpenters, four project supervisors, and one project manager in the field. We also have a full office staff and our owner Brad Lundberg is always available to answer questions and address concerns.
- Who manages your project: Lundberg Builders has a staff of four project supervisors. Our supervisors are in charge of the day to day operations of your project. Supervisors are required to visit the site daily as well as conduct the coordination of the job. They are also required to do weekly progress meetings with the clients.
- Do they offer any warranty: The state of Maryland requires all home improvement contractors to offer a one year warranty. Lundberg Builders offers this one year warranty, however we feel that this period should be proactive instead of reactive. Twice during your one year warranty we will conduct a full comprehensive evaluation of your home inside and out. Any issues we find in this evaluation that pertain to the project will be repaired free of charge. This service is available after your first year for a fixed fee, should you desire to continue the program. Any repairs after the first year will be billed accordingly.
- Can they provide documentation that they are qualified: Qualification of the trade is not required by the State of Maryland. Outside organizations such as NARI (National Association of the Remodeling Industry) and NAHB (National Association of Home Builders) provide to willing contractors qualification courses to educate them on how to properly build, design and maintain residential homes. These courses are intensive and require testing to get qualification. Lundberg Builders has employees on staff and that are certified by these organizations to include Graduate Master Builder, Certified Graduate Remodeler, Certified Kitchen and Bath Remodeler, and Certified Aging in Place Specialist.
- How do they screen and hire employees: The old adage good help is hard to find is very true. Lundberg Builders preforms a background check on all of our employees. We also have an introductory period for our employees, where we place them with our experienced crew and supervisors to identify their strengths and weaknesses.
What’s that Wednesday?
Did you see our back cover ad in the Whats Up Eastern Shore June Issue?

If you did you may have been left scratching your head trying to figure out exactly what this was. Well you can rest easy now because we’re here to explain!
The photo above was a Low-Angle Shot of a gorgeous custom staircase built in one of our clients homes. The above photograph gave the audience the feeling of looking straight up showcasing the built in skylight and unique curves of the three story staircase. This custom staircase featured a plaster half wall, round curved handrail and Brazilian Cherry stairs.

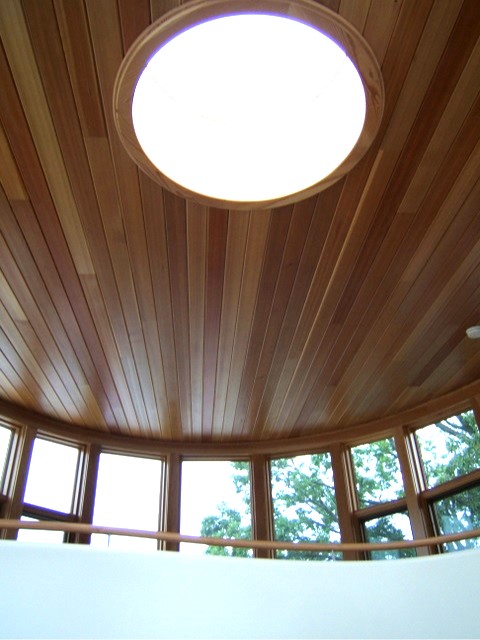


With it’s extremely unique architecture and color scheme, this is one of the most memorable homes we have built. It truly showcases why our company is different, as well as our desire to reach and exceed each clients expectations.


You can view more pictures on our website: http://www.lundbergbuilders.com/portfolio-index.php
-Brittaney